

안녕하세요. 볼드나인 프론트엔드 팀 에이든입니다. 많은 서비스에서 국제화를 제공하는 것처럼 ezstorage에서도 국제화 기능을 제공합니다. 오늘은 국제화에 사용되는 Translation resource 업로드 자동화 도입 과정에 대해서 이야기해 보려고 합니다.

이전의 국제화 업로드 플로우
간략하게 국제화 동작 방식에 대해서 설명을 하자면, react.i18next 라이브러리를 사용하여 구현되었고 이 라이브러리에서 제공하는 useTranslation이라는 hook을 사용합니다.
•
i18n은 locale 리소스를 json파일로 가져옵니다.
•
볼드나인 팀에서는 locale json 파일들을 GCP Cloud Storage 버킷에서 관리하고 있습니다;
•
언어 코드(KO, EN)를 state를 가지고 있다가 언어가 변경됩니다.
•
useTranslation이 넘겨준 함수가 호출되며 현재 언어 코드 state에 저장된 언어에 맞게 텍스트가 변경됩니다.
i18next
.use(BackEnd)
.use(initReactI18next)
.init({
lng: DEFAULT_LANG, // default language
fallbackLng: LOCALES.ko,
interpolation: { escapeValue: false },
maxRetries: 1,
backend: {
loadPath: isDevEnv // locale resources
? '/src/locales/{{ns}}/{{lng}}.json'
: `your_storage/{{ns}}/${env}/{{lng}}.json,
},
});
JavaScript
복사
const { t } = useTranslation();
const text = t('key');
TypeScript
복사
국제화 업로드 플로우 개선하기
 문제 정의 및 분석하기
최근까지 json 파일 업로드 과정이 자동화되어 있지 않았습니다. 프로젝트 내에서 개발자가 tranlation 파일을 직접 편집하고 정기 배포 후 배포 시간에 맞춰 수동으로 json 파일을 버킷에 업로드하였습니다. 어쩌면 당연하지만 여러 가지 문제점들이 있었습니다.
•
사람이 수동으로 배포하다니 배포 과정이 길어지고 안정성이 떨어짐
•
개발자가 직접 번역하다 보니 번역한 단어나 문장이 기획 의도와 다르게 번역되는 경우가 있음
•
수동으로 배포하다 보니 GCP에 권한이 있는 개발자만 번역 수정이 가능함
위와 같은 문제를 해결하기 위해 locale 파일 업로드 자동화는 시급했습니다. 그리고 기술적인 부분뿐만 아니라 번역과 관련된 프로세스에 변화를 주고 싶었습니다. 그래서 여러 번의 논의와 고민을 했고 그 결과로 나온 요구사항은 아래와 같습니다.
•
번역 파일도 코드 리뷰가 필요하다.
•
번역은 기획서와 함께 개발자에게 넘겨져야 하고 기획자가 관리할 수 있어야 한다.
•
번역 리소스는 코드 배포와 독립적으로 업로드가 될 수 있어야 한다.
그래서 다시 이 요구사항들을 고려하여 개발자, 기획자 사이에서 상호적으로 번역 파일을 관리할 수 있는 방법을 생각해 보았습니다.
새로운 플로우 생각하기
그때 생각이 난 것이 GraphlQL codegen이었습니다. GraphQL API가 제공되면 클라이언트에서는 API에 기반하여 GraphQL 질의를 작성합니다. GraphQL codegen은 작성된 GraphQL 질의를 react에서 쉽게 사용할 수 있는 HOOK, Typescript에서 사용될 타입 등을 만들어 file을 생성해 줍니다.
# users.query.mutation.graphql
query UsersOperation {
users {
id
name
}
}
GraphQL
복사
$ yarn codegen
Bash
복사
// users.query.mutation.generated
import { gql } from '@apollo/client';
import * as Apollo from '@apollo/client';
const defaultOptions = {} as const;
export function useUsersOperationQuery(baseOptions?: Apollo.QueryHookOptions<UsersOperationQuery, UsersOperationQueryVariables>) {
const options = {...defaultOptions, ...baseOptions}
return Apollo.useQuery<UsersOperationQuery, UsersOperationQueryVariables>(UsersOperationDocument, options);
}
export function useUsersOperationLazyQuery(baseOptions?: Apollo.LazyQueryHookOptions<UsersOperationQuery, UsersOperationQueryVariables>) {
const options = {...defaultOptions, ...baseOptions}
return Apollo.useLazyQuery<UsersOperationQuery, UsersOperationQueryVariables>(UsersOperationDocument, options);
}
export const namedOperations = {
Query: {
UsersOperation : 'UsersOperation' as const
}
}
TypeScript
복사
GraphQL codegen과 비슷하게 플로우를 생각해 보자!
1.
번역은 히스토리가 관리될 수 있도록 Google workspace 스프레드 시트로 관리한다.
2.
번역은 기획 단계에서 진행된다.
3.
개발 단계에서 locale 스프레드 시트를 기반으로 CLI를 통해 json 파일을 생성한다.
이 단계에서 자동 생성된 파일은 코드 리뷰도 가능하다. 이 단계를 이행하기 위해서는 파일 생성을 CLI가 필요하다.
4.
배포 시 생성된 json 파일이 자동 업로드 되도록 한다.
아이디어 구현하기
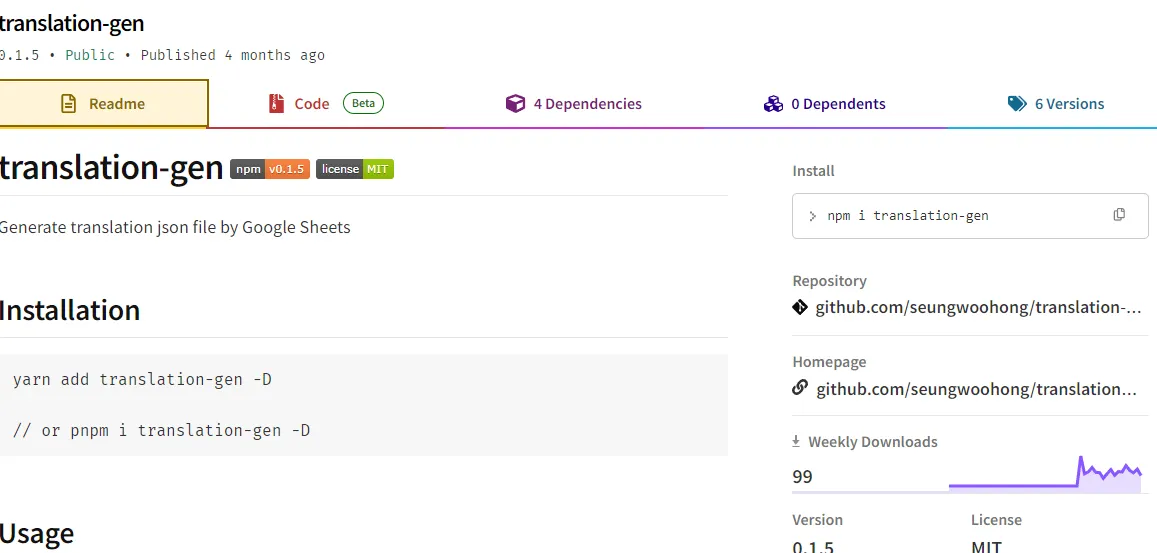
첫 번째로 Google workspace에 번역을 관리할 스프레드시트를 만들었습니다.  두 번째로 이 스프레드시트를 읽어 JSON 파일을 자동으로 만들어 주는 translation-gen을 만들었습니다.
translation-gen
translation-gen을 사용하기 위해서는 프로젝트 root에 translationgen.yaml가 있어야 합니다. translationgen.yaml 파일은 translation-gen을 사용하기 전 필요한 정보들을 담는 설정 파일입니다. 이 파일에 설정된 정보들을 가지고 스프레드시트에 접근하고 json 파일을 생성합니다.
KEY | Description | default |
target | 스프레드시트 URL | - |
serviceAccount | GCP 버킷 권한을 가진 ServiceAccount | - |
sheet | 타겟 시트 타이틀 | - |
sheetId | 시트 ID | - |
output | 프로젝트 내 생성된 JSON파일 저장 경로 | - |
locales | Array<locale>, example: ['ko', 'en'] 번역할 언어의 국가 코드 리스트 | - |
depthSeparator | key의 depth 구분을 위한 구분자 | “.” |
# tranlationgen.yaml
target: https://docs.google.com/spreadsheets/d/adfkljjdfslkjlk/edit#gid=0
serviceAccount: google-workspace-manager@your_project.iam.gserviceaccount.com
output: "./translation"
locales: ["ko", "en", "jp"]
sheet: "translation"
sheetId: your_sheet_id
depthSeparator: $
YAML
복사
그리고 필요한 것이 한 가지 더 있습니다. 서비스 계정을 인증하기 위한 key 가 필요합니다. key의 경로를 .env 파일에 RANSLATIONGEN_PRIVATE_KEY_PATH 라는 이름으로 환경 변수를 추가해 주세요.
TRANSLATIONGEN_PRIVATE_KEY_PATH="/path/to/key.json"
YAML
복사
마지막으로 package.json에 script를 추가해 주세요.
{
...
"scripts": {
"transgen": translationgen
}
}
JSON
복사
그럼 모든 준비는 끝났습니다! 이제 한 번 실행해 보죠!
$ yarn transgen
Bash
복사
그럼 output 경로에 json 파일들이 생성된 걸 볼 수 있습니다.
translation-gen 코드 분석
script를 실행하면 tranlation-gen이 실행됩니다. transtion-gen의 코드는 스프레드시트를 읽어 json 파일을 만들어주는 것만 하다 보니 코드가 아주 간단합니다.
import { GoogleSpreadsheet } from "google-spreadsheet";
import { auth } from "google-auth-library";
import yaml from "js-yaml";
import fs from "fs";
import dotenv from "dotenv";
import { error } from "console";
dotenv.config();
const getAuthKey = () => {
const key = fs.readFileSync(process.env.TRANSLATIONGEN_PRIVATE_KEY_PATH, {
encoding: "utf8",
});
return JSON.parse(key);
};
const key = getAuthKey();
const client = auth.fromJSON(key);
const getMetaData = () => {
const doc = yaml.load(fs.readFileSync("./translationgen.yaml"));
return doc;
};
const metadata = getMetaData(); // translationgen.yaml 파일 읽기
const output = metadata.output;
client.email = metadata.serviceAccount;
client.scopes = ["https://www.googleapis.com/auth/spreadsheets"];
const doc = new GoogleSpreadsheet(metadata.sheetId, client); // 설정 정보를 가지고 객체 만들기
const readSheet = async (doc, sheetTitle) => {
await doc.loadInfo();
const sheet = doc.sheetsByTitle[sheetTitle];
const rows = await sheet.getRows({
offset: 0,
});
return rows;
};
const makeDir = (name) => {
const exists = fs.existsSync(name);
if (!exists) {
fs.mkdirSync(name, { recursive: true });
}
};
const makeJSON = (rows, locale, separator = ".") => {
const json = {};
rows.forEach((row) => {
const key = row.get("KEY").trim();
const keys = key.split(separator);
const str = row.get(locale.toUpperCase());
if (!str) return;
if (keys.length === 1) {
json[prune(key)] = prune(str);
} else {
let nested = json;
const lastIndex = keys.length - 1;
for (let i = 0; i < keys.length - 1; i++) {
const currentKey = prune(keys[i]);
if (!nested[currentKey]) {
nested[currentKey] = {};
}
nested = nested[currentKey];
}
nested[prune(keys[lastIndex])] = prune(str);
}
});
return json;
};
const writeJSON = (source, path) => {
fs.writeFile(
path,
source,
{
encoding: "utf8",
},
(err) => {
const success = err === null;
if (!success) throw new Error(`Can not be created ${path}: ${error}`);
console.log(`Successfully ${path} was created.`);
}
);
};
/**
* @description Remove invalid strings generated during encoding
*/
const prune = (string) => {
return string.replaceAll("\\n", "\n");
};
const generate = async (
doc,
locales,
{ output, sheetTitle, depthSeparator }
) => {
makeDir(output); // translationgen.yaml output 경로로 디렉토리 만들기
locales.forEach(async (locale) => {
const sheetRows = await readSheet(doc, sheetTitle); // 스프레드시트 파일 읽기
const json = makeJSON(sheetRows, locale, depthSeparator); // 스프레드시트에서 읽은 데이터로 json 만들기
const source = JSON.stringify(json, null, 2);
writeJSON(source, `${output}/${locale}.json`, locale); // output 경로에 json 파일 만들기
});
};
generate(doc, metadata.locales, {
output,
sheetTitle: metadata.sheet,
depthSeparator: metadata.depthSeparator,
});
JavaScript
복사
1.
getAuthKey 함수를 호출하여 TRANSLATIONGEN_PRIVATE_KEY_PATH 경로의 키 파일을 가져옵니다.
2.
읽어 들인 key로 Google로부터 인증된 클라언트 객체를 받습니다.
3.
getMetaData 함수를 호출하여 설정 파일을 읽고 세팅합니다.
4.
makeDir 함수를 호출하여 output 경로에 디렉토리를 만듭니다.
5.
readSheet 함수를 호출하여 스프레드시트로부터 읽은 데이터를 정제하여 받습니다.
6.
정제된 데이터를 가지고 makeJSON 함수를 호출하여 json을 만듭니다.
7.
만들어진 json을 가지고 writeJSON 함수를 호출하여 json 파일을 만듭니다.
이제 스프레드시트를 JSON 파일로 자동으로 만들어주는 CLI는 만들어졌습니다. 세 번째 단계는 만들어진 json 파일을 자동으로 GCP Cloud Storage에 업로드 시키는 것입니다. 이를 해결하기 위해서 저는 Github Actions을 사용하였습니다.
각 배포 환경별 workflow마다 아래 step을 추가해 주었습니다.
id: 'upload-translation'
if: steps.changed-files.outputs.any_changed == 'true'
uses: 'google-github-actions/upload-cloud-storage@v2'
with:
path: './tranlation/'
destination: '/translation'
YAML
복사
google-github-actions/upload-cloud-storage 액션을 사용하여 파일 업로드는 수행하고 if: steps.changed-files.outputs.any_changed == 'true' 행을 작성하여 파일의 변경 점이 없을 경우에는 불필요한 step이 실행되지 않도록 하였습니다. 마지막 네 번째 단계로 코드 배포와 별개로 번역 파일을 업로드할 수 있도록 workflow 하나를 더 추가하였습니다.
name: Upload Translation
on:
workflow_dispatch:
inputs:
target:
description: 'production or staging or develop'
required: true
jobs:
upload_to_gcs:
runs-on: ubuntu-latest
steps:
- uses: actions/checkout@v4
- name: create-json # 서비스 계정 키 생성
id: create-json
uses: jsdaniell/create-json@v1.2.2
with:
name: 'key.json'
json: ${{ secrets.GOOGLE_WORKSPACE_MANAGER_KEY }}
- name: Set key path # 환경 변수 세팅
run: |
echo "TRANSLATIONGEN_PRIVATE_KEY_PATH=./key.json" >> .env
- name: generate translation
run: pnpm tgen # json 파일 생성
- id: 'auth'
uses: 'google-github-actions/auth@v2' # GCP 인증
with:
credentials_json: ${{ secrets.GOOGLE_WORKSPACE_MANAGER_KEY }}
- id: copy-folder
run: |
cp -r ./src/locales/translation ./${{github.event.inputs.target}}/
- id: 'upload-folder' # JSON 파일 업로드
uses: 'google-github-actions/upload-cloud-storage@v2'
with:
path: './${{github.event.inputs.target}}'
destination: '/translation'
YAML
복사
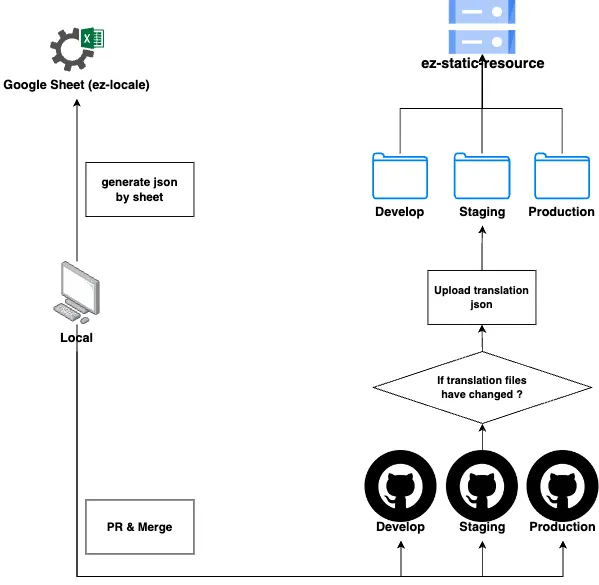
이 Workflow는 환경별로 수동 배포할 수 있도록 하여 기획자, 개발자가 사용할 수 있도록 하였습니다. 여기까지가 새로운 번역 파일 업로드 플로우 아이디어의 구현 과정입니다. 아래 이미지는 플로우를 도식화한 그림입니다.
마치며
개선된 플로우가 베스트는 아닐 수 있겠지만, 처음에 목표로 세웠던 자동화 업로드 구현을 완료하였고 이전보다는 프로세스가 많이 줄어든 것을 체감할 수 있었습니다. 이것이 완벽하지 않다는 것을 알기에, 계속 적으며 사용하며 발견되는 개선점을 반영하여 발전시키고 공유드리도록 하겠습니다.
지금까지 긴 글 읽어 주셔서 감사합니다!